How to Make Natural Lip Balm; Ingredient Deep Dive
If you’ve ever wondered exactly what goes into the lip balm you apply ten times a day, you’re not alone. Learning how to make natural lip balm at home puts you in complete control, you choose every ingredient, skip the synthetic fillers, and end up with something that genuinely works. Better still, a single batch costs a fraction of what you’d pay for boutique balms at the pharmacy.
This guide gives you a tried-and-tested natural lip balm recipe with exact measurements, a clear method, and straight answers on where to source quality ingredients in South Africa. No chemistry degree required.
Why Make Your Own Beeswax Lip Balm?
Most commercial lip balms rely on petrolatum (petroleum jelly) or synthetic waxes to create that protective layer. These ingredients aren’t harmful at low levels, but they don’t actually nourish, they sit on top of the skin rather than working with it.
A homemade beeswax lip balm is different. Beeswax forms a breathable, protective barrier. Shea butter and carrier oils deliver real moisture. And because you make it yourself, you know exactly what’s in it.
There’s also a practical side for South African makers. A 50 g batch, enough for ten tubes, costs significantly less per unit than buying finished products. If you’re gifting, selling at markets, or simply stocking up for your family, that difference adds up quickly.
Natural Lip Balm Ingredients: What You Need and Why
The wax base: beeswax
Beeswax is what gives lip balm its structure. Without it, your blend of butters and oils would stay liquid at room temperature. The wax creates a firm, smooth stick that holds its shape in a tube and melts cleanly on contact with warm lips.
For cosmetics, always use cosmetic-grade beeswax, either yellow (lightly filtered, with a faint honey scent) or white (fully refined, neutral scent). Both work well. Yellow beeswax adds a subtle natural fragrance; white gives you a blank canvas for added flavours.
In a lip balm formula, beeswax typically makes up 25–30% of the total weight. Go higher and the balm becomes hard and draggy. Go lower and it softens too much, especially in South Africa’s warmer regions.
Can you substitute beeswax? Yes, candelilla wax is a popular vegan alternative, but it’s roughly twice as hard as beeswax, so you’d use about half the amount. Carnauba wax behaves similarly. These swaps work, but they do change the texture, so expect a little trial and error on your first vegan batch.
Butters and oils for moisture
Butters add body, nourishment, and that skin-soft feel. Shea butter is the most popular choice for good reason: its high stearic and oleic acid content means it melts at skin temperature, leaving a soft, non-greasy film that keeps lip balm feeling comfortable rather than waxy.
Cocoa butter is a firmer alternative. It adds a light natural chocolate scent and slightly more rigidity, useful if you’re working in a warm climate and want extra hold.
For the liquid carrier oil, jojoba oil is ideal. Technically a liquid wax rather than a true oil, jojoba is extremely stable, absorbs well, and has a very long shelf life, all valuable properties in an anhydrous (water-free) formula. Check out our jojoba oil benefits and formulation tips if you’d like to understand exactly why it performs so well in lip care. Sweet almond oil is a softer, slightly richer alternative if you prefer.
Optional extras: vitamin E, fragrance, and colour
Vitamin E (tocopherol) at around 0.5–1% of your formula acts as an antioxidant. It slows the rancidity of your oils and butters, extending shelf life without any synthetic preservatives, very useful in a product that sits in a warm bag or car. Learn more about how vitamin E works in skincare formulas to understand its broader role in formulation.
Fragrance and flavour oils should be cosmetic-grade and confirmed lip-safe. Vanilla, mint, and berry are perennial favourites. Use these at 0.5–1%, they’re potent, and lips are sensitive.
Colour is optional. Cosmetic-grade micas or lip-safe oxides can give you a subtle tint. More on this in the customisation section below.
The Natural Lip Balm Recipe
How to make Natural Lip Balm
The formulas below is scaled to a 50 g batch, enough to fill approximately ten standard 4.5 g lip balm tubes. It’s a manageable first run that lets you test the formula without wasting ingredients.
For a Softer Balm, use this formula
| Ingredient | Percentage | Weight (50 g batch) |
|---|---|---|
| Cosmetic-grade beeswax | 28% | 14 g |
| Shea butter | 22% | 11 g |
| Jojoba oil | 48% | 24 g |
| Vitamin E oil | 1% | 0.5 g |
| Fragrance / flavour oil (optional) | 1% | 0.5 g |
| Total | 100% | 50 g |
For a Firmer Balm, use this formula
| Ingredient | Percentage | Weight (50 g batch) |
|---|---|---|
| Cosmetic-grade beeswax | 32% | 16 g |
| Cocoa butter | 32% | 16g |
| Jojoba oil | 34% | 17g |
| Vitamin E oil | 1% | 0.5 g |
| Fragrance / flavour oil (optional) | 1% | 0.5 g |
| Total | 100% | 50 g |
A note on scaling: Because these formulas is percentage-based, you can double or triple it simply by adjusting the total weight. The ratios stay the same.
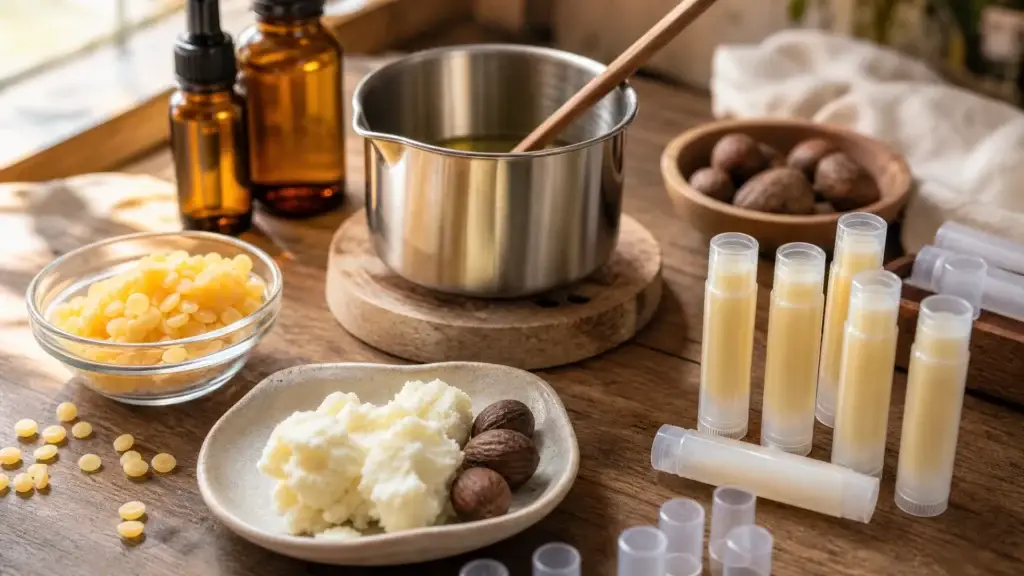
Equipment checklist
- Digital kitchen scale (accurate to 0.1 g)
- Heat-proof glass jug or pouring beaker
- Saucepan for the double boiler
- Silicone spatula or stirring rod
- Thermometer (optional but helpful)
- 10 × 4.5 g lip balm tubes, caps fitted and standing upright in a holder or piece of cardboard
Step-by-step method
- Weigh everything first. Measure your beeswax and shea/cocoa butter into the glass jug, and your jojoba oil into a separate small cup. Set the vitamin E and fragrance aside.
- Set up a double boiler. Place the glass jug in a saucepan of gently simmering water. Make sure the jug base doesn’t touch the water directly.
- Melt the wax and butter. Stir occasionally until fully melted and combined. The mixture will be clear and golden.
- Remove from heat. Lift the jug out of the water bath.
- Stir in the jojoba oil. Pour it into the melted wax and butter and stir gently to combine.
- Add vitamin E and fragrance. Stir both in while the mixture is still fluid but starting to cool slightly.
- Pour into tubes. Work quickly, the mixture sets fast. Pour in a steady stream, filling each tube to just below the rim. Pour at around 70–75 °C (just above the wax’s melting point) to reduce air pockets and surface pitting.
- Leave to set. Don’t move the tubes for at least 30 minutes. You’ll likely see a small dip in the centre as the balm contracts.
- Top up if needed. Reheat any leftover mixture and add a small top-up pour to level the surface.
- Cap and label. Once fully cool and firm, add caps and label with ingredients and the date made.
Sourcing Your Lip Balm Ingredients in South Africa
Finding cosmetic-grade ingredients locally used to be the biggest barrier for South African DIY makers. That’s no longer the case.
DIY Naturally stocks cosmetic-grade beeswax, shea butter, jojoba oil, and vitamin E, all the core ingredients for this recipe, with delivery across South Africa, so you can source everything in one place.
A few things to look for when buying:
- Beeswax: cosmetic grade, either yellow or white. Avoid candle-grade wax, which may contain impurities.
- Shea butter: unrefined retains more natural nutrients and has a mild nutty scent. Refined is neutral-smelling and works well if you’re adding fragrance.
- Jojoba oil: cold-pressed, cosmetic grade. Golden jojoba is unrefined; clear jojoba is refined. Both work in this recipe.
- Vitamin E: look for tocopherol (not tocopheryl acetate) for best antioxidant performance in an oil-based formula.
Getting the right grade of each ingredient makes a real difference to the finished balm, so it’s worth buying from a supplier that specifies cosmetic-grade stock.
Filling and Packaging: Choosing the Right Lip Balm Tubes
Standard lip balm tubes hold 4.5 g, that’s the size you see in most pharmacies and cosmetic brands. They’re twist-up, recyclable, and available in clear or white. For a 50 g batch, you need exactly ten.
Tips for clean, mess-free filling:
- Stand your tubes in a row in a piece of corrugated cardboard or a purpose-made tube rack before you start.
- Pour in one continuous motion rather than stopping and starting, stopping mid-tube creates visible lines in the finished balm.
- If the mixture starts to solidify before you finish, briefly return the jug to the water bath for 10–15 seconds to re-liquefy.
- Expect a slight dip after setting, this is normal wax contraction, not a mistake. Top up with a second small pour.
Good packaging does more than look nice. A properly sealed tube protects your formula from contamination and keeps the balm from melting in transport. If you’re planning to gift or sell your balms, a clean, labelled tube with a tight-fitting cap makes a real difference to how the finished product is received.
The easiest way to get started is with a lip balm kit from DIY Naturally, which bundles the key ingredients and tubes together so you don’t have to source each piece separately.
Customising Your Natural Lip Balm Recipe
Once you’ve nailed the base recipe, the real fun starts. Here are a few directions to take it:
Tinted lip balm: Add a small amount of cosmetic-grade mica or lip-safe oxide, typically 0.1–0.5% of total batch weight. Stir well before pouring, as pigments can settle. Rose and berry tones are perennially popular.
Extra SPF support: Raspberry seed oil and carrot seed carrier oil are both rich in antioxidants and are sometimes used as supplementary oils in lip care for added skin benefit. They don’t replace tested SPF sunscreens, but they do add skin-conditioning value.
Scent combinations: Vanilla and sweet orange, peppermint and eucalyptus, or a simple unflavoured balm all work well. Keep fragrance at or below 1% to avoid irritation on lips.
Firmer or softer texture: Add 1–2 g more beeswax for a firmer balm (handy in summer). Reduce wax slightly for a softer, more emollient feel.
If this batch inspires you to go further, our beginner’s guide to skincare formulation covers the principles behind building all kinds of natural products, from lip care through to creams and serums. And once you’ve got lip balm down, how to make a natural face cream at home is a natural next step.
Making your own lip care is genuinely straightforward once you have the right ingredients and ratios. Start with this batch, see how it feels on your lips, and adjust from there. That’s the whole point of making it yourself.
Ready to start your first batch? Grab the lip balm kit from DIY Naturally, everything you need, measured and ready to go. Sign up to the DIY Naturally newsletter for more recipes and ingredient guides delivered straight to your inbox.
Disclaimer: All recipes and formulas are shared in good faith. DIY Naturally is not liable for any adverse reactions. Always perform a patch test before use, and substitute ingredients if you have known allergies. Use at your own discretion.